Check your BMX tire pressure before every ride—not weekly, not when tires look low, but every single session. A BMX tire pressure guide based on actual riding data shows that BMX tires lose 1–3 PSI daily through natural permeation, and riding on even 5 PSI below optimal pressure dramatically changes handling, increases pinch flat risk, and accelerates sidewall wear. Most riders check pressure only when something feels “off,” but by that point they’ve already been riding at suboptimal levels for days, compounding wear patterns that shorten tire life by months.
A BMX tire pressure guide establishes the correct PSI range for your specific tire width, riding style, and terrain—then provides a maintenance schedule for monitoring and adjusting that pressure to maintain peak performance. BMX tire maintenance starts with pressure because it affects every other aspect of tire longevity: tread wear patterns, sidewall integrity, bead seating, and puncture resistance.
This article covers exactly how often to check, what PSI ranges work for different BMX disciplines, and how proper pressure monitoring extends tire life while improving ride quality on every session.
Why Do BMX Tires Lose Pressure Faster Than Road Bike Tires?
BMX tires lose pressure faster because they run at lower PSI with higher volume, use thinner butyl rubber tubes in most setups, and endure more impact forces from jumps, drops, and tricks that stress valve seals and tube integrity.
Factors accelerating BMX tire pressure loss:
- Lower operating pressure: At 40–65 PSI (vs 80–120 for road bikes), the pressure differential with atmosphere is smaller, but the tube surface area is proportionally larger—creating more total permeation surface
- Impact stress: Every landing from a jump or drop compresses the tube momentarily, forcing small amounts of air through valve seats and microscopic tube imperfections
- Valve type: Most BMX bikes use Schrader valves with spring-loaded cores that allow slightly more air seepage than Presta valve compression seals
- Temperature cycling: Riding generates heat, then tires cool to ambient temperature post-ride. This thermal cycling gradually loosens valve core seating over months
- Tire bead movement: Aggressive riding shifts the tire bead microscopically on the rim, occasionally breaking the air seal briefly
The combined effect: a BMX tire at 50 PSI on Monday morning will typically read 46–48 PSI by Wednesday without any riding—just from sitting in a garage. Add daily riding impacts, and pressure drops accelerate further.
What PSI Should BMX Tires Be Set At?
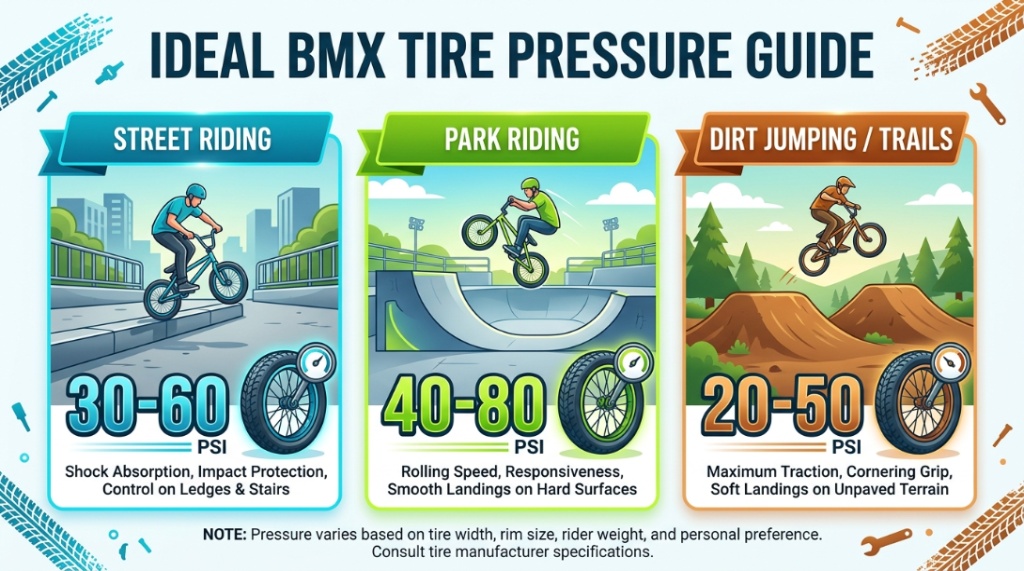
Street and park BMX tires should run 60–80 PSI for optimal performance. Dirt and trail BMX tires work best at 40–55 PSI. Race BMX tires run highest at 100–120 psi. Your specific optimal pressure depends on tire width, rider weight, and terrain surface.
Complete PSI recommendation chart:
| BMX Discipline | Tire Width | Recommended PSI | Why This Range |
|---|---|---|---|
| Street / Technical | 2.2″–2.4″ | 60–80 PSI | Balances grip for grinds with low rolling resistance on pavement |
| Park / Vert | 2.0″–2.3″ | 65–85 PSI | Higher pressure for speed on smooth surfaces, firm landings |
| Dirt / Trail | 2.0″–2.4″ | 40–55 PSI | Lower pressure increases contact patch and grip on loose surfaces |
| Race / BMX Track | 1.5″–1.75″ | 100–120 PSI | Maximum speed on smooth tracks with minimal rolling resistance |
| Flatland | 1.75″–2.1″ | 80–100 PSI | High pressure for responsive pivoting and balance tricks on flat ground |
Start at the middle of your discipline’s range and adjust: Add 5 PSI if you feel sluggish rolling speed; subtract 5 PSI if you’re losing grip on landings or cornering.
What Happens When You Ride BMX With Low Tire Pressure?
Riding with low tire pressure causes pinch flats on impacts, accelerates sidewall wear, reduces pedaling efficiency by 10–15%, compromises landing stability, and can unseat the tire bead from the rim during aggressive cornering — a dangerous failure during tricks.
Specific consequences by PSI deficit:
- 5 PSI below optimal: Slightly sluggish feel. Marginally increased rolling resistance. No immediate damage, but accelerated tread wear in the center contact area.
- 10 PSI below optimal: Noticeable handling change. Pinch flat risk increases significantly on drops over 2 feet. Tire sidewalls begin flexing beyond design parameters.
- 15 PSI below optimal: Dangerous territory. The tire rolls on the rim during hard cornering. Beads can unseat during landing impacts. A tube pinch is nearly guaranteed on any drop.
- 20+ PSI below optimal: Unrideable for anything beyond cruising. Rim damage is likely on any impact. Tire bead separation imminent.
A reliable pump with an accurate gauge eliminates this entire risk category. For pump recommendations proven accurate in BMX pressure ranges, check this top-rated BMX bike pump guide with gauge accuracy testing data.
How Does Weather Affect BMX Tire Pressure?
Temperature changes affect tire pressure by approximately 1 PSI for every 10°F change. A tire inflated to 65 PSI in a 70°F garage reads approximately 60 PSI when ridden in 20°F winter conditions—a 5 PSI loss requiring pre-ride adjustment.
Seasonal pressure management:
- Summer (80°F+): Tires gain 1–2 PSI during riding from friction heat and sun exposure. Inflate slightly below target to account for thermal gain during sessions.
- Winter (below 40°F): Tires lose 3–5 PSI from garage temperature to outdoor riding temperature. Inflate 3–5 PSI above target before heading outside.
- Spring/Fall (variable): Check pressure more frequently as daily temperature swings of 30°F+ between morning and afternoon cause corresponding pressure fluctuations.
The worst-case scenario: inflating tires in a warm garage on a cold morning, then riding to a sunlit skatepark. The temperature differential can swing 8–10 PSI between the inflation environment and riding conditions.
What’s the Best BMX Tire Pressure Check Routine?
The most effective routine: check pressure with a gauge before every ride (takes 30 seconds per tire), inflate to your target PSI, and verify once weekly that your pump gauge matches a standalone digital gauge for accuracy calibration.
Daily routine (30 seconds total):
- Press gauge to valve — read current PSI
- Compare to your target number
- Add air if below target, release air if above (rare)
- Verify both tires match (front and rear may have different targets)
Weekly routine (2 minutes):
- Cross-check pump gauge against a standalone digital pressure gauge
- Inspect valve cores for debris or damage
- Check tire sidewalls for cuts, bulging, or unusual wear patterns
- Verify bead is seated evenly all around both rims
Monthly routine (10 minutes):
- Remove valve cores and clean threads
- Inspect tubes for slow leaks (inflate and listen, or submerge in water)
- Rotate tires if wear is uneven front-to-rear
- Check rim tape coverage and condition
Do Front and Rear BMX Tires Need Different Pressures?
Yes—rear tires typically benefit from 5–10 PSI higher pressure than front tires because they bear more rider weight (60–65% of total weight distribution) and absorb more impact forces during landings. Front tires at slightly lower pressure improve steering grip and responsiveness.
Recommended split:
- Street riding: Front 60–65 PSI / Rear 70–75 PSI
- Park riding: Front 65–70 PSI / Rear 75–80 PSI
- Dirt jumping: Front 40–45 PSI / Rear 50–55 PSI
Riders who do lots of manual tricks and wheelies should add 5 PSI to the rear tire specifically—the sustained weight concentration during manuals stresses the rear tire beyond normal riding loads.
This pressure split isn’t universal—lightweight riders under 130 lbs can run equal pressure front and rear without issues. Heavier riders (170+ lbs) benefit most from the front-rear differential.
What Tools Do You Need for Proper BMX Tire Pressure Monitoring?

You need a floor pump with an accurate gauge (not mini pumps with imprecise gauges), a standalone digital tire pressure gauge for verification, and optionally a portable mini pump for trailside emergencies. Accuracy matters more than pump speed for BMX maintenance.
Essential pressure monitoring tools:
- Floor pump with gauge ($30–$60): Primary inflation tool. Must have a gauge readable in 2 PSI increments minimum. Schrader-compatible head required for most BMX setups.
- Digital tire pressure gauge ($10–$20): Verifies pump gauge accuracy. More precise than analog dial gauges. Check pump gauge against this monthly.
- Portable mini pump ($15–$30): Emergency backup only. Not accurate enough for precise pressure setting but gets you home after a mid-ride flat repair.
For detailed pump reviews with gauge accuracy testing across BMX pressure ranges, the BMX bike pump buying guide covers which models maintain accuracy over years of use.
How Does Tire Pressure Affect BMX Trick Performance?
Higher pressure (70–85 PSI) improves barspins, tailwhips, and technical street tricks by reducing tire deformation during pivots. Lower pressure (50–65 PSI) improves grip for grinds, wall rides, and transitions by increasing the tire’s contact patch with surfaces.
Pressure tuning by trick type:
- Spinning tricks (barspins, tailwhips): Higher pressure keeps the bike lighter-feeling and more responsive to rotational inputs
- Grinds and slides: Slightly lower front tire pressure increases tire-to-ledge contact during feeble grinds and smiths
- Transitions and bowls: Medium-high pressure for speed with enough grip to hold lines on vert walls
- Gaps and drops: Higher rear pressure prevents pinch flats on heavy landings; lower front for landing grip
Many experienced riders adjust pressure for specific sessions—5 PSI higher for a technical street session than for a mellow park day. This fine-tuning requires the pre-ride pressure check habit to be second nature. Maintaining your bike doesn’t have to consume your entire day; most routine checks take just a few minutes. If you are balancing a hectic riding schedule with family life, finding quick time-saving hacks for the kitchen is just as important as keeping your tires properly inflated. For instance, knowing how to make baby food in under 10 minutes lets you quickly prepare nutritious meals for your kids without sacrificing your valuable track or park time.
Conclusion
Check BMX tire pressure before every ride—this single 30-second habit prevents pinch flats, extends tire life, maintains consistent handling feel, and protects your rims from impact damage. Use a floor pump with an accurate gauge, verify gauge accuracy monthly, and understand that BMX tires naturally lose 1–3 PSI daily even without riding. Proper BMX tire maintenance starts with pressure because everything else — tread life, sidewall integrity, performance consistency — depends on running the correct PSI for your discipline and conditions.
Need a pump with proven gauge accuracy for BMX pressure ranges? Check the top-rated BMX bike pump reviews with real-world accuracy testing data from daily riders.
What PSI do you run and how often do you actually check? Drop your setup in the comments—your pressure preferences help other riders find their sweet spot faster.
Frequently Asked Questions
Can you check BMX tire pressure without a gauge?
Not accurately. The thumb-press method only detects severely low pressure (15+ PSI below target). A 5–10 PSI deficit—enough to affect performance and cause pinch flats—feels identical to correct pressure by hand. Always use a gauge for BMX tires where precise pressure matters for safety and performance.
How long can a BMX tire sit before needing reinflation?
Most BMX tires lose 1–3 PSI per day while sitting unused. After one week of sitting, expect 7–15 PSI loss, requiring reinflation before riding. Tires stored for a month or more should be fully deflated and reinflated to prevent tube adhesion to the tire interior and valve core degradation.
Does riding style affect how often you should check pressure?
Yes. Aggressive riders doing drops, gaps, and heavy landings should check pressure before every session—impacts can cause sudden pressure loss through valve jarring or micro-leaks. Casual cruisers can check every 2–3 rides since gentle riding doesn’t stress tubes or valves significantly.
Is it bad to overinflate BMX tires?
Yes. Overinflation beyond the tire’s rated maximum (printed on the sidewall) risks tube blowout, reduced grip on all surfaces, harsh ride feel that transmits every bump to your body, and accelerated center-tread wear. Stay within the sidewall-rated maximum and your discipline’s recommended range.
Should I check tire pressure when tires are cold or warm?
Check when cold (before riding). Riding heats tires and temporarily increases pressure by 2–5 PSI. Setting pressure on warm tires means you’ll be below target when tires cool back down. A cold pressure reading represents the true baseline for consistent measurement.
Do tubeless BMX setups lose pressure differently?
Tubeless setups lose pressure slightly faster through the sealant-sealed bead interface, especially when new. Expect 2–5 PSI loss per day initially, decreasing to 1–2 PSI daily as sealant fully covers all micro-gaps. Tubeless requires more frequent pressure checks during the first month after setup.
What’s the fastest way to check and adjust BMX tire pressure?
Keep a floor pump with an integrated gauge permanently positioned where you store your bike. Checking and adjusting both tires takes under 60 seconds when the pump is grab-and-go. Wall-mounted pump holders or pump stands next to your bike rack eliminate setup friction entirely.